There are 19 Datacards to find in LEGO Star Wars: The Skywalker Saga. You can use them to purchase stud multipliers and other “cheats” like Retro Mode, Big Head Mode, and Hologram Mode. Finding them all will also give you the “What Have You Done With Those Plans?” trophy or achievement.
Their locations are outlined below in alphabetical order by planet. Some planets aren’t accessible from the start, and you’ll need specific classes only unlocked in certain episodes and missions for some. It’s worth playing through The Skywalker Saga naturally before returning through free roam to clean up any you’ve missed.
Where to Find Datacards in LEGO Star Wars: The Skywalker Saga
Click the links below to jump to specific planets.
- Bespin
- Cantonica
- Coruscant Federal District
- Coruscant Uscru District
- Crait
- Dagobah
- Endor
- Exegol
- Geonosis
- Hoth
- Jakku
- Kashyyk
- Kef Bir
- Mustafar
- Takodana
- Tatooine Mos Espa
- Tatooine Judland Wastes
- Tatooine Mos Eisley
- Yavin 4
Bespin: Cloud City
- Coordinates: X: -6.1 Y: 0.4 Z: 21.5
From the landing pad, stay right and go around the backside of the building in front of you. Look over the edge into the larger area below. You’ll see three staircases. Jump down two levels, and stay right of the right staircase. Hop on the platform’s edge and look down and to the left slightly. You’ll see a doorway and a grapple point. Jump down and break open the door with the scavenger breaker blaster.
Cantonica: Canto Bight
- Coordinates: X: -3.1 Y -12.2 Z: 52.8
Go north from the landing zone. Take the larger pathway on the right into Canto Bight. Continue under the bridges and up the stairs. Go right at the top, then left immediately. Continue down this narrower path, and you’ll see a grapple point on the building at the next left.
Follow the grapple points around, and you’ll eventually see a balcony. Drop down to grab the Datacard.
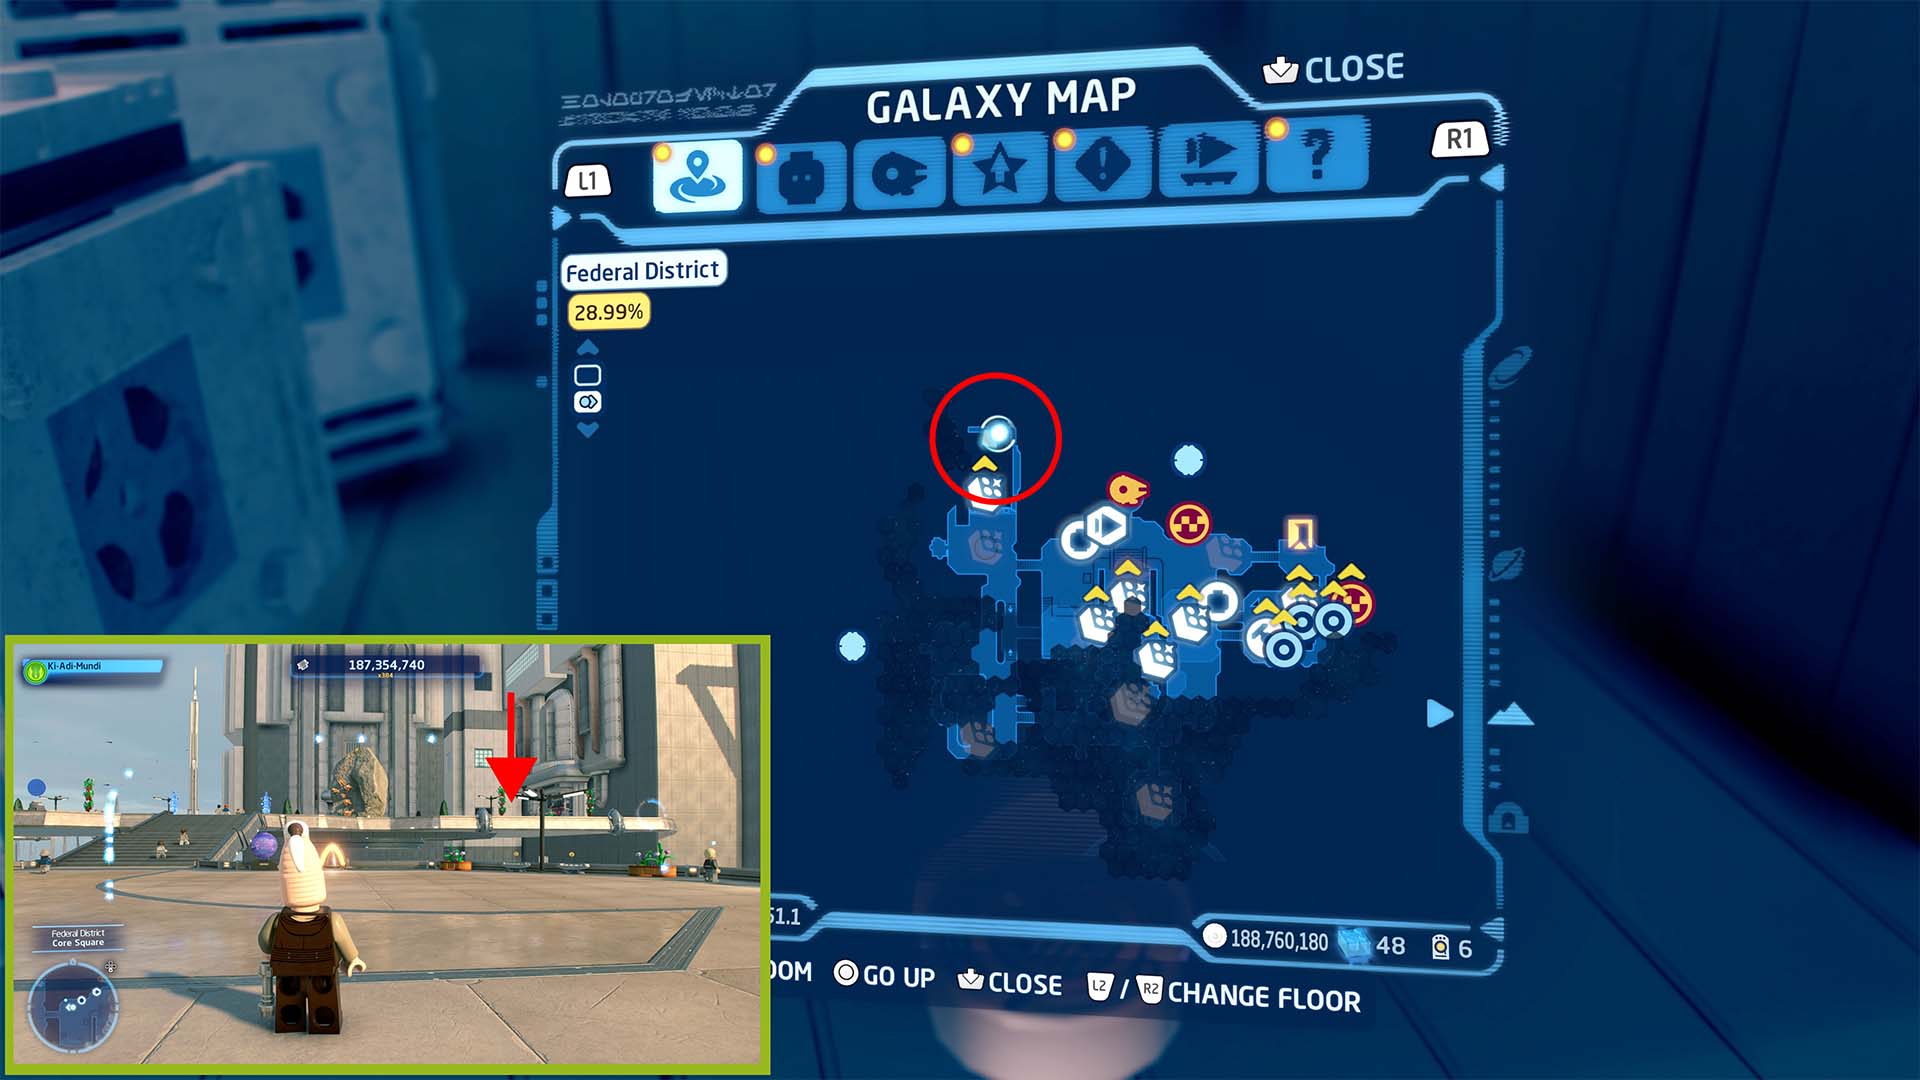
Coruscant: Federal District
- Coordinates: X: -48.0 Y: -0.3 Z: 51.1
From the landing pad in the Federal District, go right, past the story level marker for Out for the Count. Go up the stairs, then right at the top. You’ll see a large stone between two red doors. Go to the left of the door on the right, and break through the black grate on the ground.
Follow the path past the gold gate and all the way around. It will curve left and have two planks to cross before curving left again. Here, you’ll find two switches on the ground. Place crates on these to disable the red forcefield to the left for the Datacard.
Coruscant: Uscru District
- Coordinates: X: -1.2 Y: 0.9 Z: -24.0
With your back to the taxi fast travel area, go left. Go down the path with a hologram of a Duros and a larger purple hologram of a Twi’lek behind it. At the end, go right. Follow the path through the building into a larger area with neon signs. You’ll see a grey and gold domed building on the left. Jump to it, and follow the path around to the back for the Datacard.
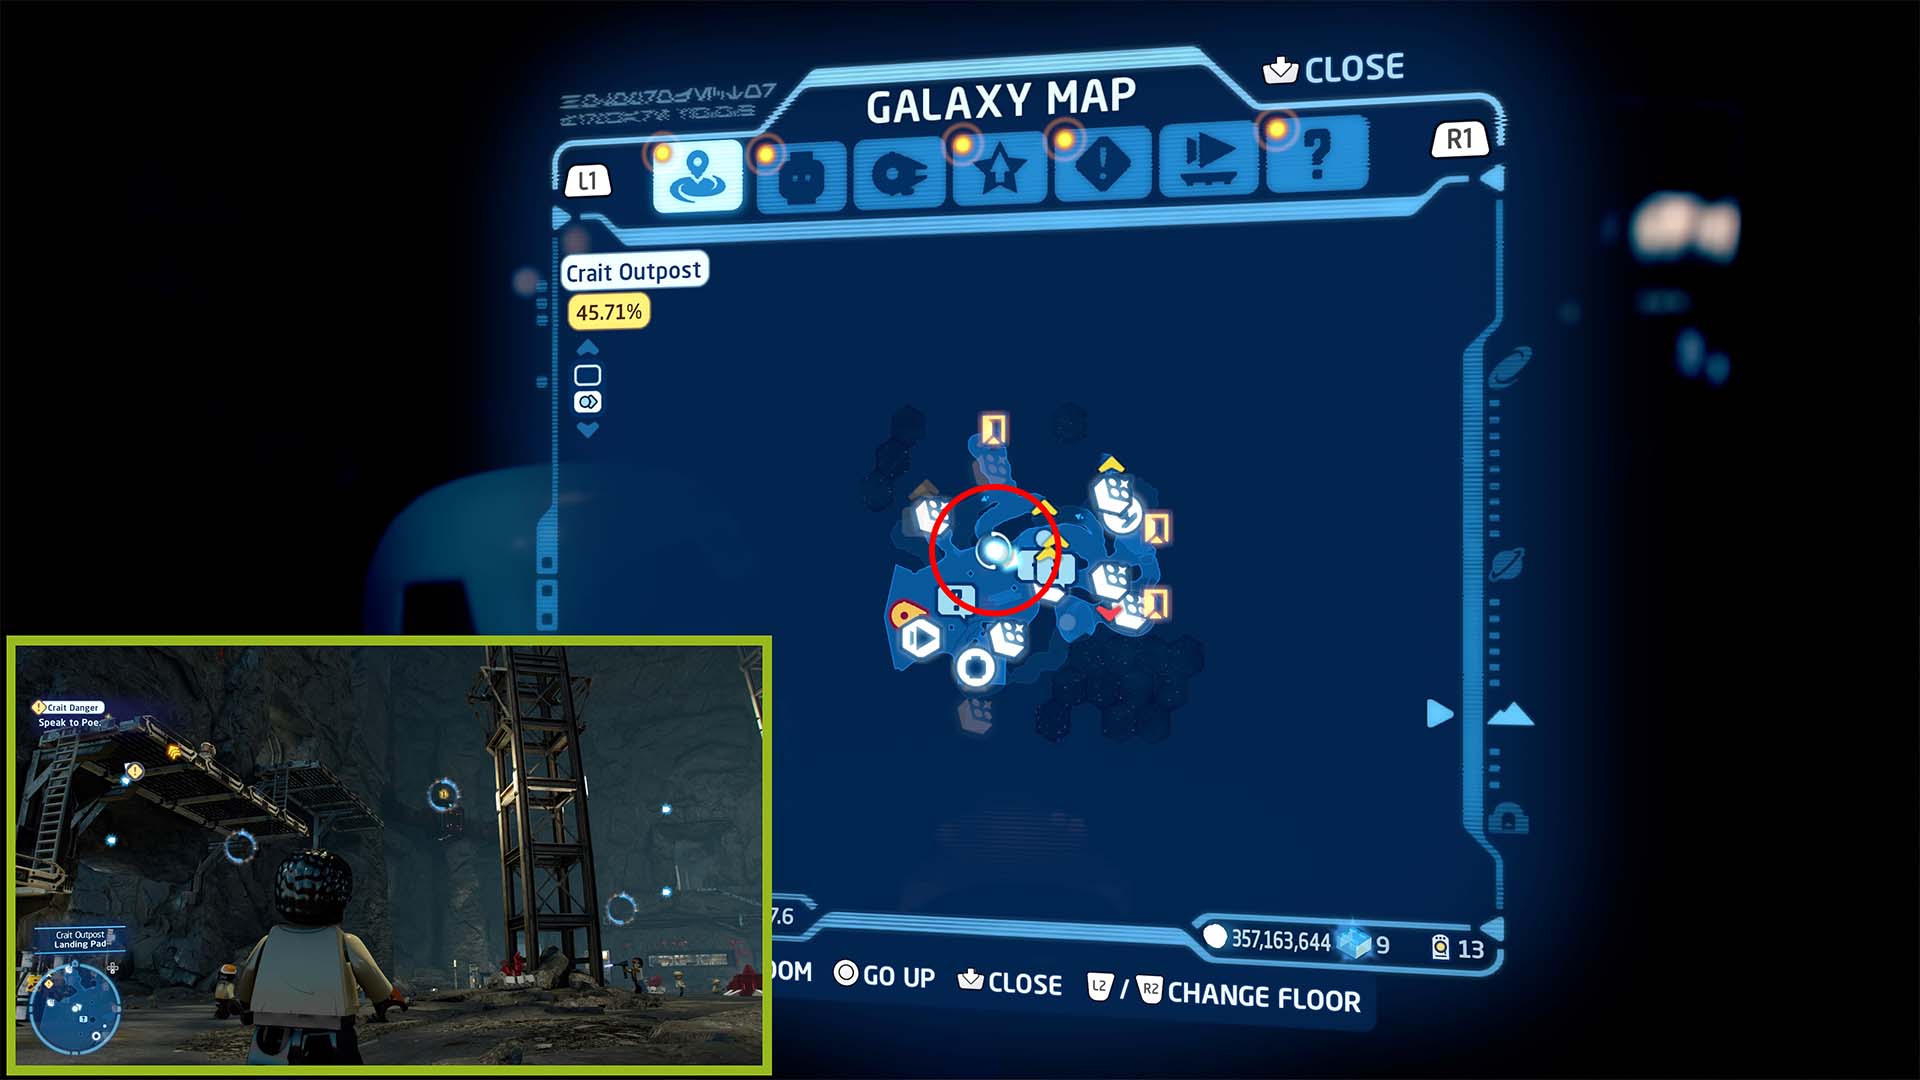
Crait: Crait Outpost
- Coordinates: X: -12.1 Y: 5.3 Z: 9.0
During the Crait Danger mission, you’ll need to speak with Poe after fixing the satellite array. Follow the objective markers down from the array and to the left side of the hangar.
Climb up a short ladder, another taller one, and finally, a third. You’ll see the Datacard spinning on a ledge in front of you. With Finn (or a similar character), run to the end of the platform and jump off. Use the grapple point to climb up and claim this one.
Dagobah: Dragonsnake Bog
- Coordinates: X: -32.9 Y: 1.7 Z: 15.8
This Datacard is to the right of the landing pad. Facing the water and Luke’s downed X-Wing, turn right. You’ll see a bent tree making an archway between two dirt hills. Go through the archway, and look up. You’ll see this one on a branch. Use Luke’s grapple ability to grab the handholds on the back of the branch and climb up.
Endor: Ewok Village
- Coordinates: X: 4.0 Y: 4.8 Z: 25.1
From the landing platform, go right and up the ramp toward the tree with the breaker blaster wall. Go right past the wall, and follow the pathway all of the way down to the bottom. At the end, shoot the target behind the foliage directly in front of you. This will open a door in the tree behind you, revealing the Datacard.
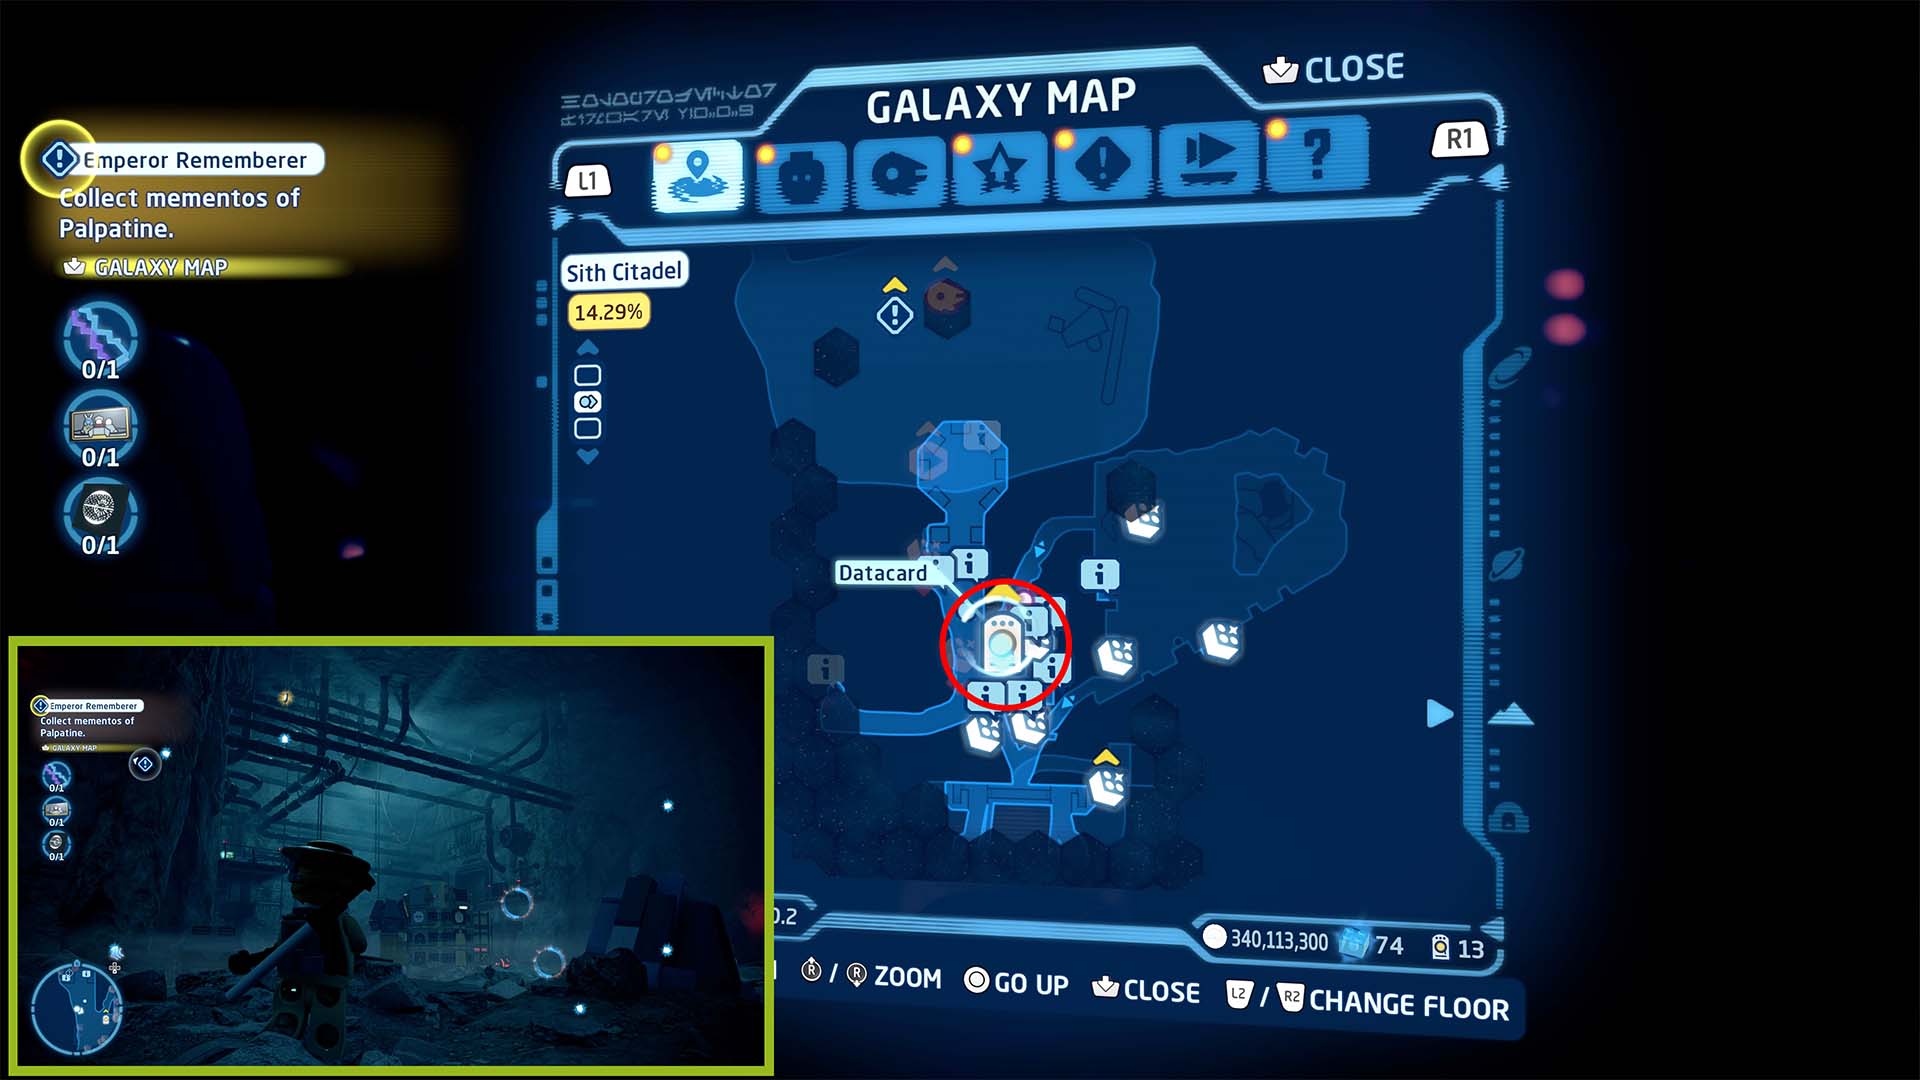
Exegol: Sith Citadel
- Coordinates: X: 7.9 Y: -3.8 Z: -29.9
Go straight from the landing pad and take the elevator down. At the bottom, follow the path into the main area of the Citadel. Behind the puzzle, you’ll see stairs leading up to two rooms on either side of the area. Go up the right side and follow the path to the end.
Jump over the railing to catch the rope. Climb up, and jump off onto the pipes at the top. Follow the pipes to the left for this one.
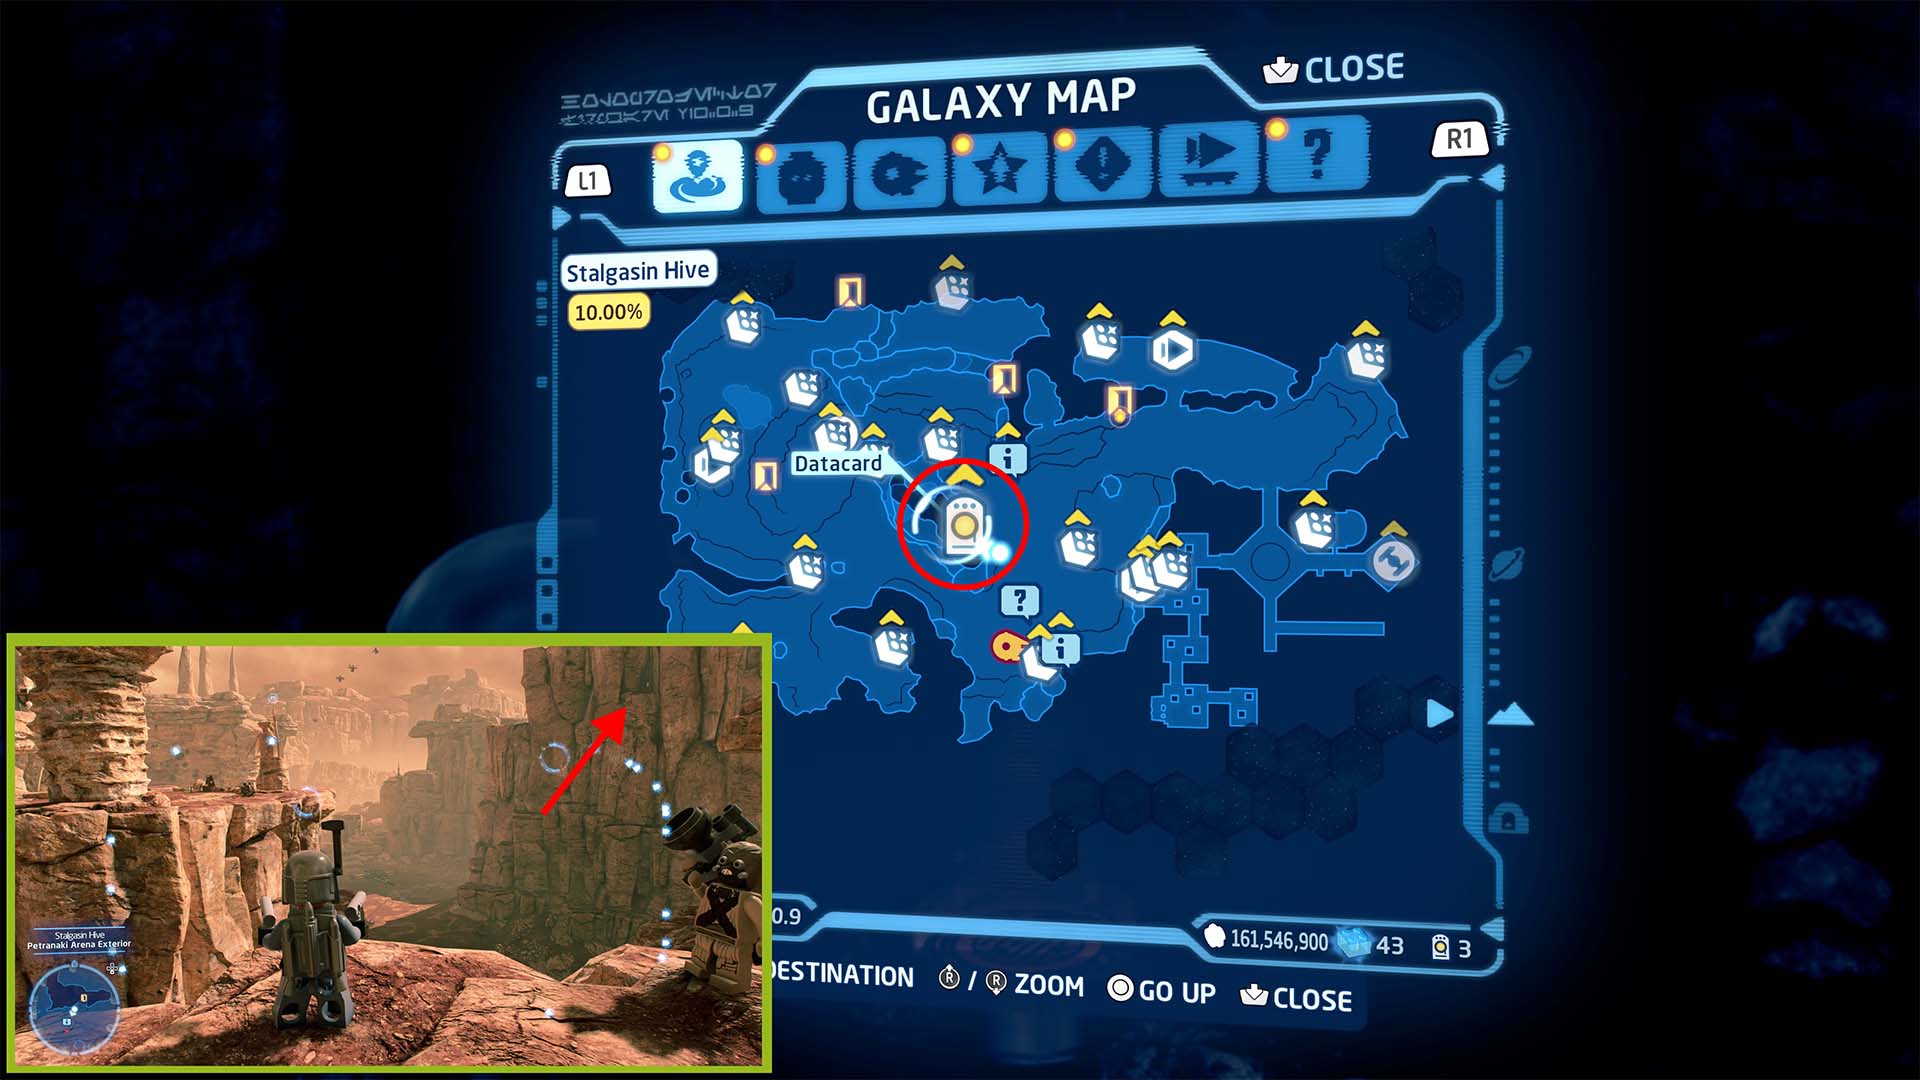
Geonosis: Stalgasin Hive
- Coordinates: X: -1.2 Y: 21.4 Z: -17.5
Go past the protocol droid at the landing pad, then turn right to go up the hill. At the top, turn right. Use the scavenger net to climb up the cliff to the left of the triangular door. Go straight over the rocks at the top.
Pass the cage with the Kyber Brick inside it and drop down along the cliff again. It will look like you’re going back down to the landing area, but there is a narrow pathway if you stay along the cliff. Drop down again along the narrow edge, and you’ll see grapple points leading up the cliff.
Hoth: Echo Base
- Coordinates: X: -0.2 Y: 3.9 Z: -1.2
From the spawn point in Echo Base, look up at a light fixture on the ceiling to find this one. Climb the grapple points on the wall on the northeastern side of the hangar. Once on the gangway above the hangar, jump over to the first light fixture platform, then jump out to the left to get the grapple icon to appear on another. Grapple as normal across the next two to reach the Datacard.
Jakku: Niima Outpost
- Coordinates: X: -46.7 Y: -1.7 Z 46.3
This one is northwest of the landing pad at Niima Outpost, in the top left corner of the map. Cross the desert from the landing pad, and the terrain will slope down into Niima Canyon with Tie Bomber, Tie Fighter, and X-Wing wrecks. Near those, on the left side, is a Star Destroyer thruster jutting out of the sand. Jump onto the thruster, then down the cavity in the middle for this Datacard.
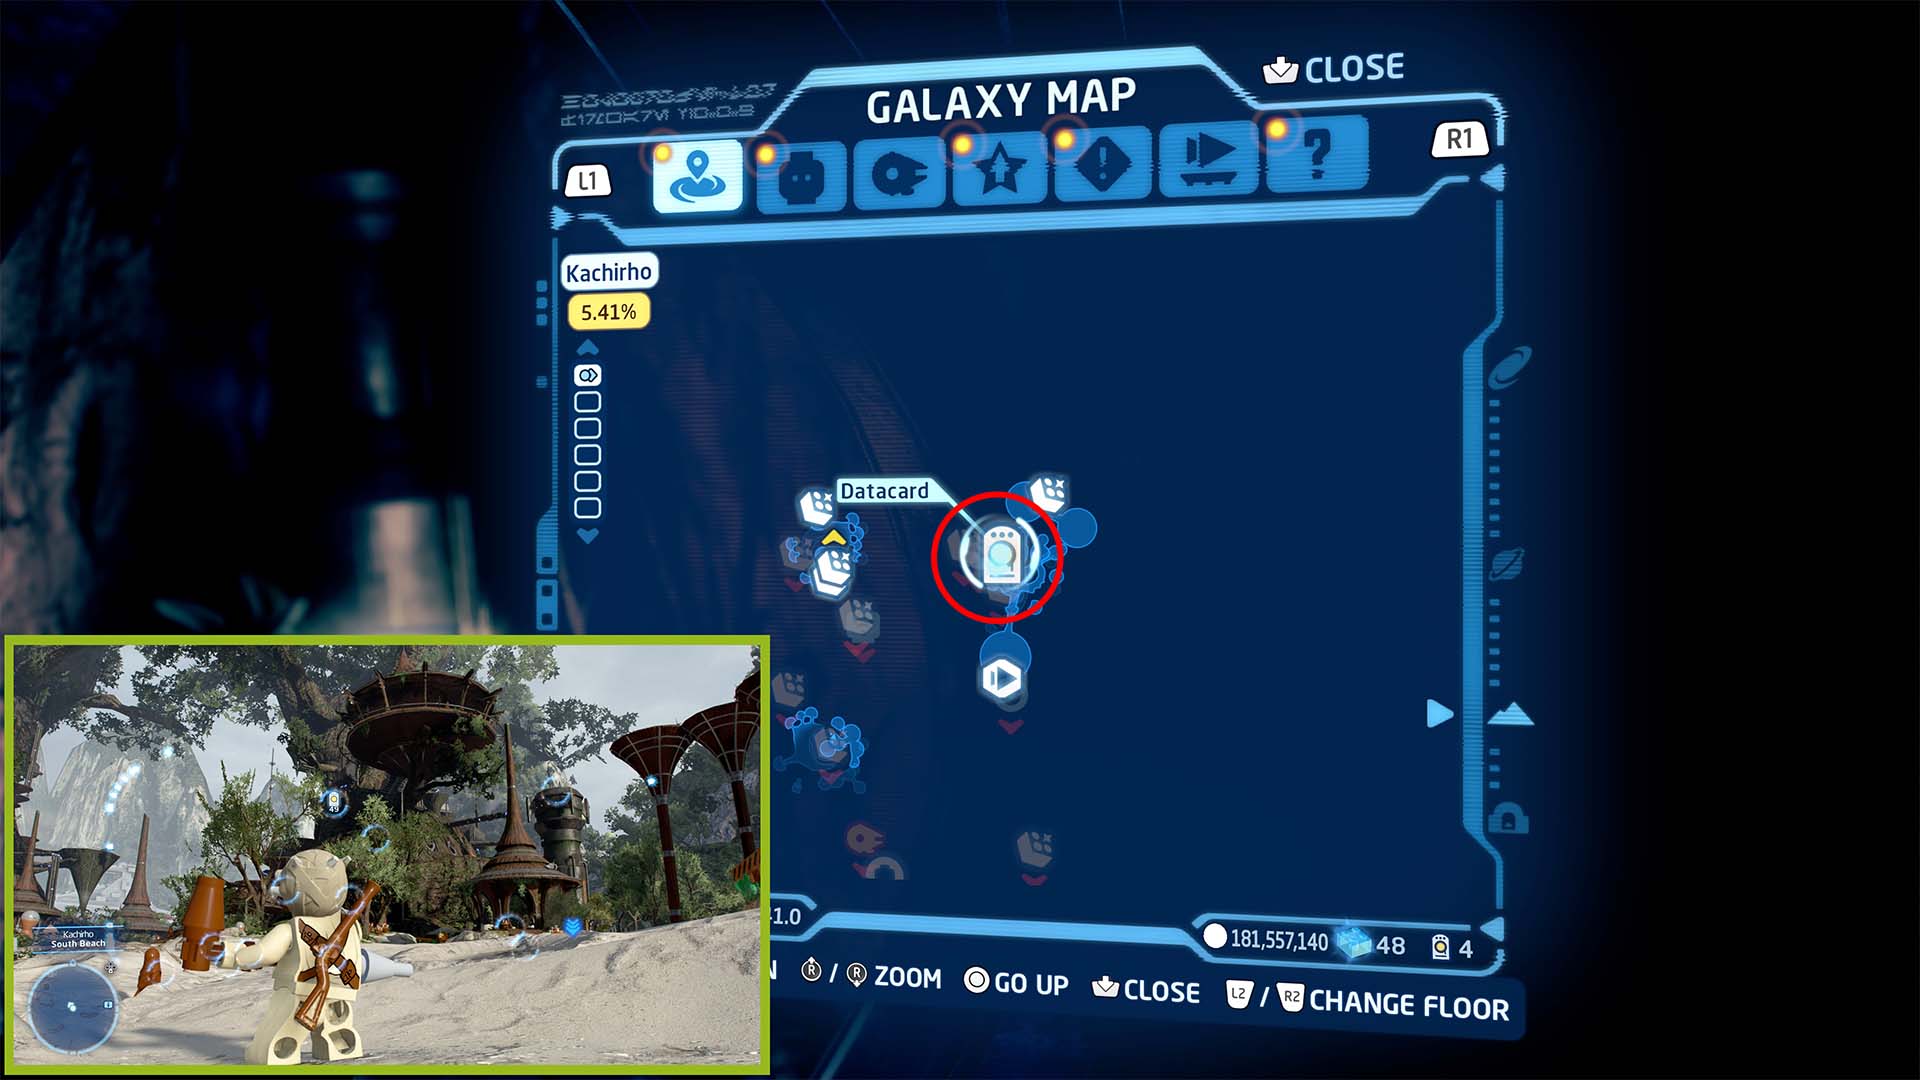
Kashyyk: Kachirho
- Coordinates: X: 24.4 Y: -5.7 Z: 41.4
From the landing zone, go to the building and tree just to the northeast. Follow the dirt and grass pathway up and to the right. Go left into the building when you reach the top, then immediately right to follow the spiral walkway up. Keep going until you go through a triangular doorway. Turn left through the door, then immediately left to climb yet another dirt pathway.
Turn left at the top and jump over the gap in the wooden platforms (there’s a large pipe going up and down here). The Datacard is in a small nook to the left.
Kef Bir: Crash Site
- Coordinates: X: -10.9 Y: -1.1 Z 33.8
From the landing pad, take the left path that leading through the rocks. Go all the way to the village on the northern side of the map. Turn left at the end of the path, just as you reach the edge of the village. Hop over the fence and go behind the thatched hut directly in front of you.
Mustafar: Mining Complex
- Coordinates: X: -0.7 Y: 2.0 Z: 67.2
From the landing pad, go diagonally right and through the gold-lit tunnel. Continue through three doors, a command center, and another door. Once outside again, go through a tall tunnel and up some stairs. Follow the path to the left, then right at the battle droid.
Go past the gold and red explosive barrels, and up the large staircase to the left. Go to the top, and then to the back left edge. There will be a huge pipe by the cliff; look down toward the lava, and use the grapple points on the pipe to climb counterclockwise for the Datacard.
Takodana: Maz’s Castle
- Coordinates: X: -31.0 Y: -0.4 Z: -23.9
Follow the path to the left of the water behind the landing pad. Just past the fisherman, you’ll see the glow of the Datacard in the water. At the end of the path is a column; climb to the top of that and press a switch.
Tatooine: Mos Espa
- Coordinates: X: -14.9 Y: 3.5 Z: 10.0
This Datacard can be retrieved after the Boonta Eve Race story level at the beginning of To the Senate! Coming from Watto’s Shop, there will be a cutscene with a protocol droid running into a house on the left side of the area. Jump over the house into the alley behind it.
Turn around on the other side. Where the row of houses stops at the cliff, you’ll see a doorway with a rusty droid on the ground inside. The Datacard is to the right of the droid.
Tatooine: Judland Wastes
- Coordinates: X: 44.4 Y: 19.6 Z: 7.9
Go to Old Ben Kenobi’s House in the southern portion of the middle tier of Judland Wastes. Climb the dark- and light-brown LEGO wall behind it and up the three handholds. Go left at the top. Use the poles on the cliff to swing over to another cliff.
Continue forward and swing across three more poles. When you land along yet another cliff, continue along it to the right, past the small bridge leading to the left. Climb up the rock at the end (this may take several double-jump tries), and follow the path around until you reach a large gap with Jabba’s Palace in the background. Jump over and grab the Datacard.
Tatooine: Mos Eisley
- Coordinates: X: 33.0 Y: 0.9 Z: 19.4
From the landing pad, go to the edge of the northeastern portion of the map. You’ll find a rectangular building with red and beige awnings near a Dewback and a moisture vaporator. The Datacard is underneath the awnings on the second floor.
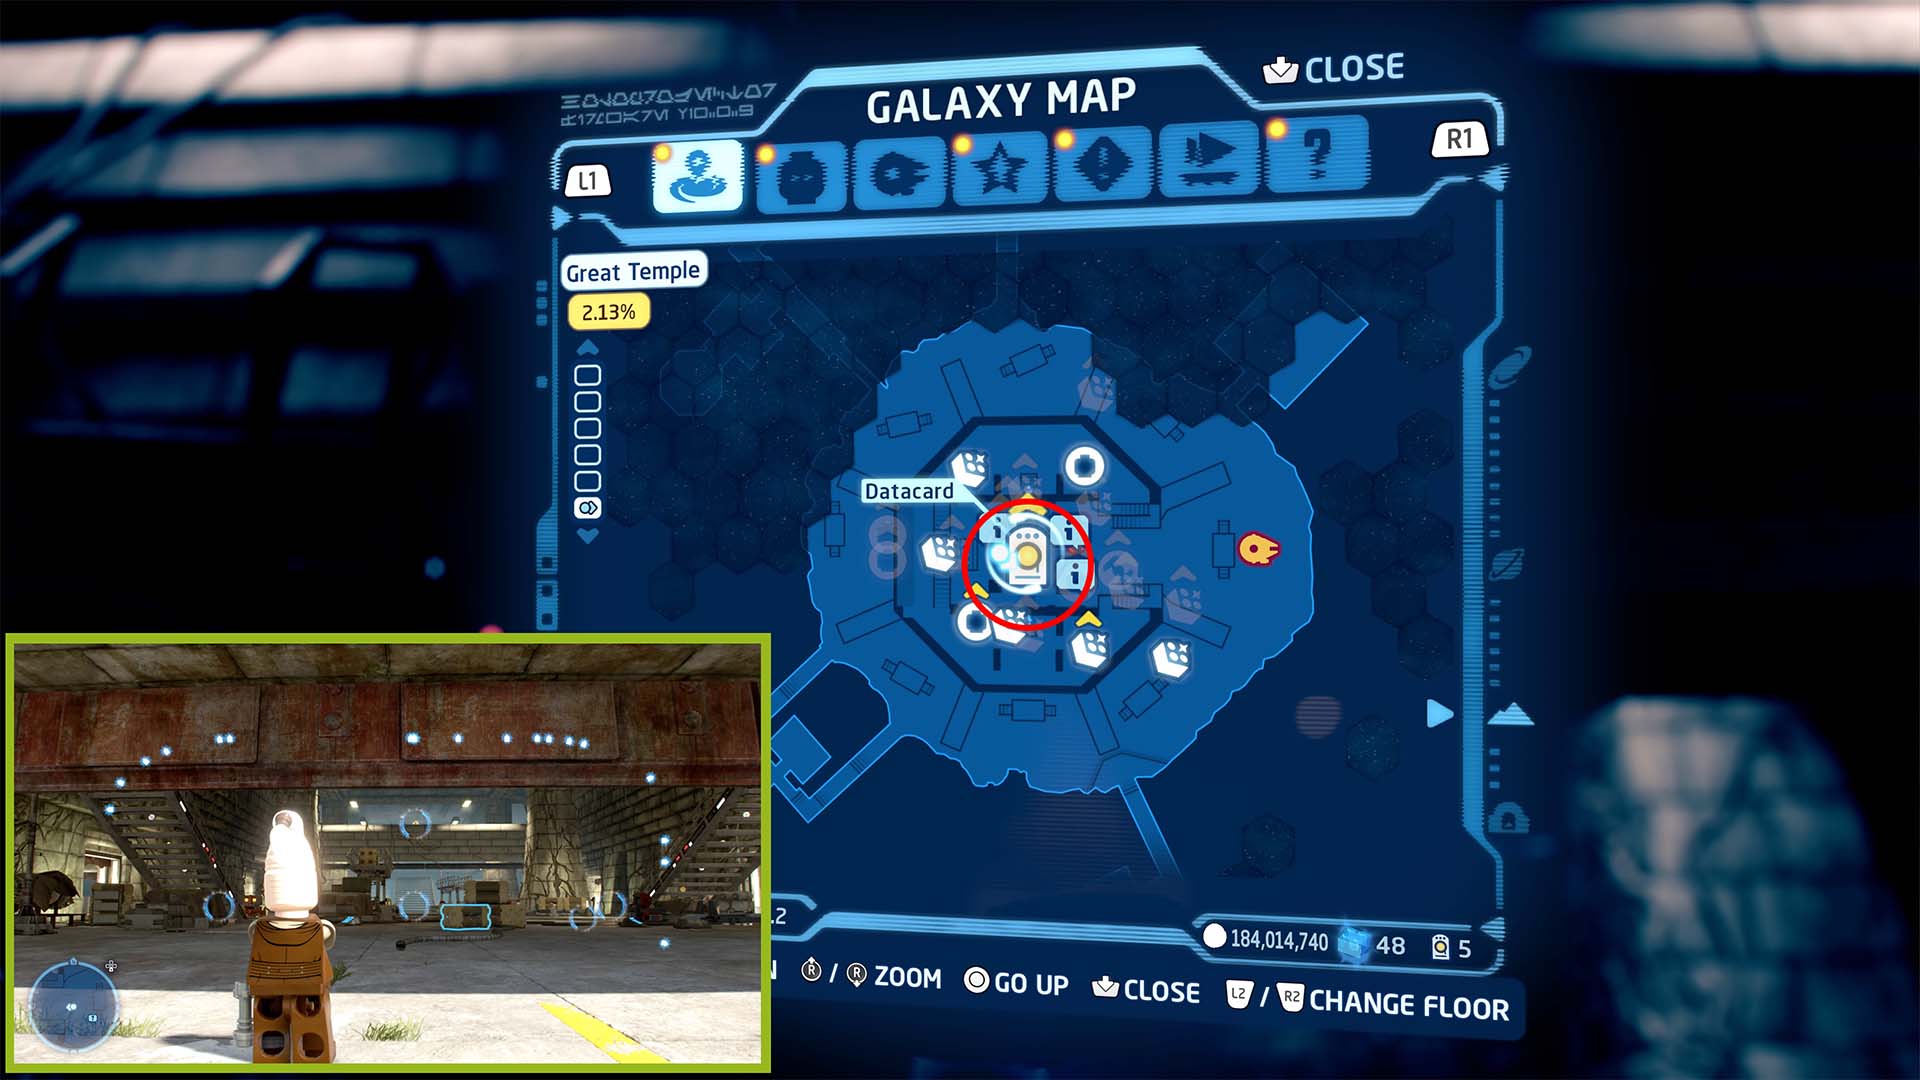
Yavin 4: Great Temple
- Coordinates: X: 0.0 Y: 3.1 Z: 0.6
This Datacard is in the center of the Great Temple on Yavin 4. Look straight ahead from the landing pad; you’ll see it spinning on the crossbeam just above the main area. Simply go to the backside of the crossbeam and use the grapple points to climb up and reach it.
Those are all of the Datacards and their locations in LEGO Star Wars: The Skywalker Saga. To learn how to get the Scavenger tools, check out our guide on how to get them. We’ve also outlined all of the character abilities to help you pinpoint which skills to upgrade first. For more, head over to our Skywalker Saga hub.











Published: Apr 19, 2022 03:54 pm