The wonders of the Shrine of Ocean’s Fortune are yours to pillage in Season 4 of Sea of Thieves. Sure, you could fetch a hefty coin by chasing lost gems and trinkets, but the real treasure is within the pages of hidden journals.
Five journals are scattered across this undersea maze. You need to collect all the journals from this and five other shrines in order to unlock the Mysteries of the Sunken Kingdom commendation.
Sea of Thieves Shrine of Ocean’s Fortunes Journal Locations

Sail your ship to the area marked as the Shrine of Ocean’s Fortune on your map. When you see the telltale glow of a mermaid shrine, dive in and start your swim down.
The Shrine of Ocean’s Fortune is arranged as a large vertical column. Swim to the base, the entrance is behind a massive wooden door marked with red coral.
Journal 1: Your Beautiful World

As soon as you enter the shrine swim upward until you can stick your head above water. You will be in a channel separating two pieces of land.
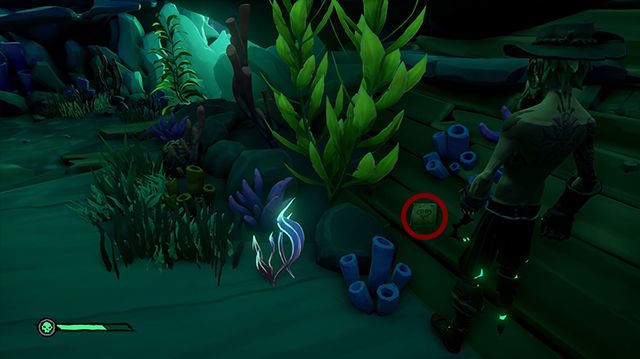
Follow this channel as it snakes to the rear of the shrine. Near the end of the waterway, you will find a pile of boards to your left. The first journal is atop this pile.
Journal 2: I’m Close, I Can Feel It

The next journal can be found after you climb the ladder up from the lowest level of the shrine, and use a pulley to setup a platform to the right of a prison door.
Use the platform to cross a short gap, and enter the tunnel to your left. The journal is a small distance forward, hugging the left-hand wall, toward a lever lit by some bio-luminescent algae.
Journal 3: Love is Stronger Than Hate

Continue ascending the shrine and you will eventually be accosted by some coral covered skeletons in a side tunnel.
The third journal is shortly past them, close to where the tunnel reached the central chamber, on the floor near the left wall.
Journal 4: I Have Failed You

The fourth journal is near the top of the shrine. Work your way up until you cross a small wooden bridge, and fight a group of ocean crawlers.
There is a partially wrecked ship’s hull against the wall to the left (based on the direction you were facing as you entered). The journal is resting on this wreckage.
Journal 5: Do Not Give Up Hope

The final journal is near the top of the uppermost chamber. Work your way past a series of jumping puzzles until you reach a mermaid statue.
To the right of it is a hollowed-out ship’s hull with a large piece of glowing purple coral at the far end. The journal is near the coral, to the right of the large central beam of the hull.
That’s it, all five journals found. Gather any loot you see and head back to your ship. That’s five journals down, twenty five to go.
Check out some of our other Sea of Thieves guides here on GameSkinny:
- SoT Legend of the Sunken Kingdom Voyage Walkthrough
- SoT Shrine of Ancient Tears Journals Walkthrough
- SoT Shrine of Hungering Journals Walkthrough
- SoT Shrine of the Coral Tomb Journals Walkthrough
- SoT Shrine of Tribute Journals Walkthrough
- SoT Secret Waters Commendation Guide
- Where to Find the Kraken in Sea of Thieves
- SoT Dark Desires Commendation Guide
- SoT Strike Your Colours Commendation Guide
- SoT Lost Shipments Voyage Guide


Published: Sep 30, 2021 01:44 am