So you've already checked out our guide on the best places to land in Fortnite, but with the latest Fortnite map update, there are a ton of new landing zones for people to check out, making landing decisions even harder. People are also beginning to catch on to the fact that places like Fatal Fields and Pleasant Park have a ton of loot, and those previously empty spaces are seeing more and more people. If you want to continue avoiding players at the start and still give yourself a fighting chance for that win, here are some more spots and routes to consider when landing.

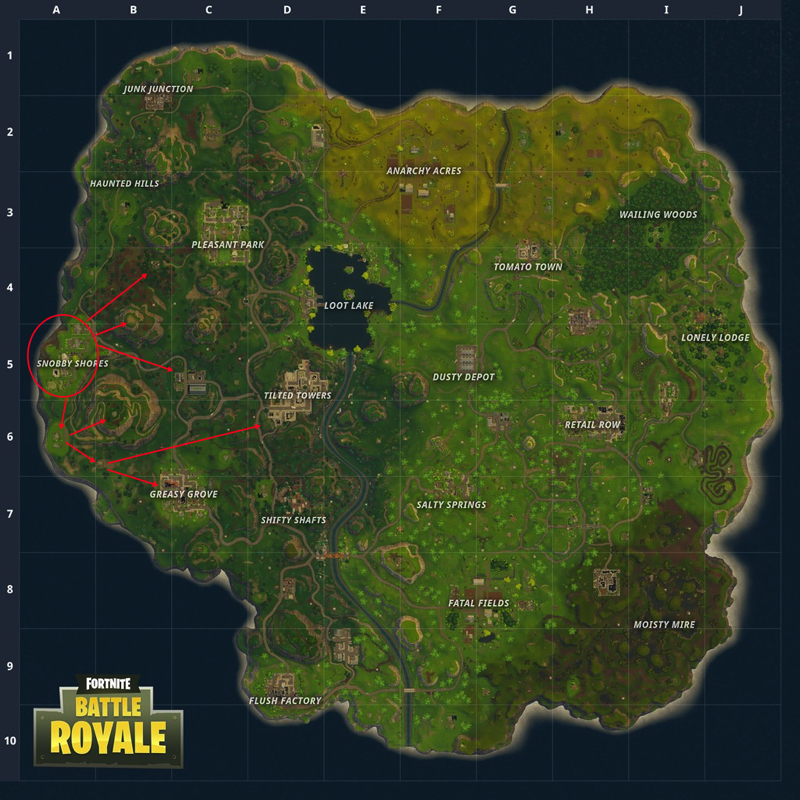
Snobby Shores
This is the only named location in this guide, but these magnificent houses deserve their place in any good player's handbook. Every single home has great loot and a chest or two, and the brick fences can be torn down for some handy stone. If you see other players coming to these houses, be sure to get one a bit further away from those players; there's enough loot to go around, so you shouldn't have to fight over weapons as soon as you land. My personal favorite is the southernmost house. It features a hidden basement that usually has several chests and ammo boxes.
The other great part about this landing spot is it gives you plenty of options of where to go next, depending on where the circle may be, if you saw other players nearby, etc.
- You can raid the other houses, and this is a no brainer if you didn't see other players land with you. This is also a great option if you got a great gun in your first house and did see players at the other houses and want to take care of them quickly.
- There are two smaller houses in the south of Snobby Shores that are a great place to check out next. From those two houses you can proceed up the hill to the northeast, you can go Tilted Towers for a bit of action, or you can continue further southeast towards a southern circle, stopping at places like Greasy Grove and the bridge near Shifty Shafts.
- I also recommend hitting up one of the two big hills nearby. They can offer you a great view of your surroundings, and you can keep a lookout for other players while planing your next stop towards the circle.

South River
With no official names, going forward I'll provide easy names to call out and to remember these spots by (plus, they're marked on the images). South River features a couple of decent houses and a bridge to start off from. It's a great place to start if you want to avoid combat until later. Bridges are considered dangerous once the game is underway, but if you're quick at the start, they are a great place to pick up some loot and possibly even a chest or two. The reason this is a great spot to begin your route is because it again gives you a lot of options without being too dangerous to start in. Your route is often dictated by where the circle is, but no matter which direction you go from the south river, there is something close by you can visit.
- You can head to Fatal Fields and clean up what others landing there have left behind. As one of the less popular landing zones, going to Fatal Fields a few minutes after landing almost guarantees it'll be empty. If it's been looted, it's easy to tell, and you can move on. Sometimes nobody lands there at the start of the game, and you can then go on a looting spree. Don't forget to harvest a couple of the tractors to stock up on metal (but be wary, they do make a lot of noise).
- You can also go east toward Moisty Mire, the most underrated area in the game (perhaps it's the cringy name). On the way you'll come across stacks of trucks -- they usually have two gold chests on the cars, which should also be harvested for metal before moving on. From those cars you can move north to the prison or continue east into Moisty Mire; the biggest tree in the Mire can be surrounded by up to three chests.
- Don't neglect going westward, either, if the circle lies to the northwest. There are two major spots on either side of a hill that can provide you a great lookout point before moving forward.

Racetrack
This is my favorite spot in which to land in recent history. You can ideally start at the house on the east side of the track, or you can go to the western fort. If you notice a few players landing with you, you can opt to land further east; there are a few buildings just over the small hill near the track. After landing, you have a ton of options for your route.
- If you have a really great circle that is really close/already surrounding you, then you should travel to the Moisty Mire. Even if you'd be leaving the circle, the Moisty Mire is a great spot to fill in any gaps in your inventory from the start, and it is fairly safe. You can go to the prison from the mire or continue southwest to the stack of cars we mentioned earlier.
- If you got really good loot upon landing, then you should think about heading to Fatal Fields or Salty Springs to see if you can take out a few players before the circle shrinks. That way you can loot the weapons they got instead of looking for treasure chests.
- "Pro" Tip: Other players love to harvest, so if you're low on material, getting a quick kill or two should definitely help you get the resources you need to build a worthy fort.
- I also like to head north from the racetrack to this little trailer park that typically has a lot of loot in a small amount of space. It also has RVs for gathering metal. You need to be careful here, though, because people like to visit this area from the Lonely Lodge and Retail Row. It's also in a valley, which means you don't have the high ground when you are there, so you need to move quickly. If you're the more aggressive type, be sure to stay on top of the hills in the area and look down into that space for advantageous fights.
- A more arduous but still valid journey is the trip north of the racetrack. You can head to the Lonely Lodge and clean up over there or begin to head towards the Tomato Town tunnel. There is a secret room in the tunnel by the orange car, which you should always check for a chest or two if you're near the area. Just tear down the wall in front of the orange car, and you should find the room.

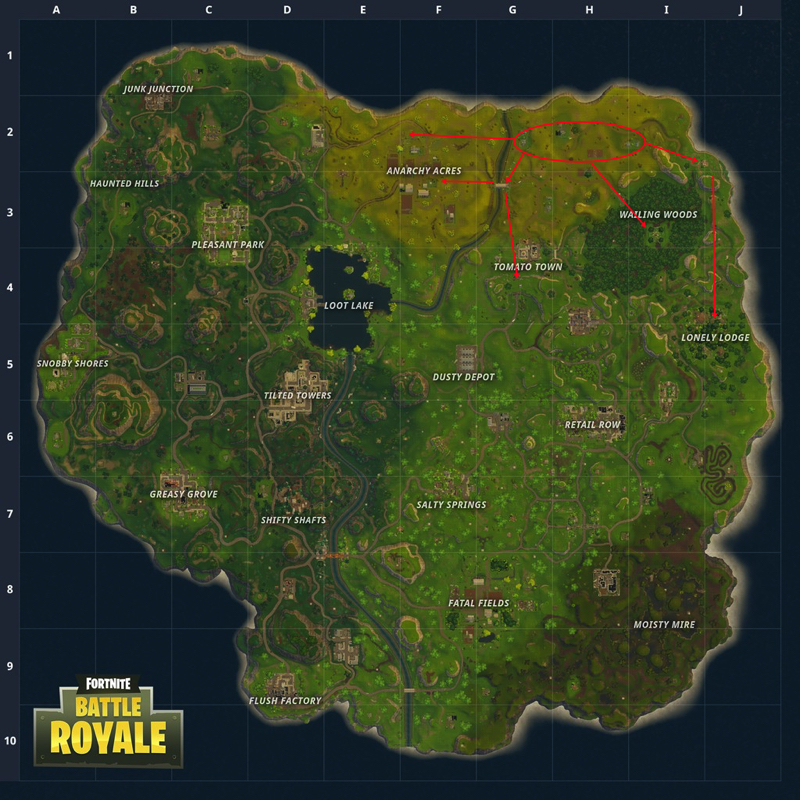
Northeast River
This spot is a lot like South River from earlier and another great spot if you want to avoid combat at first. There are plenty of houses that come in pairs, so this is a great spot for Duos. There are several key points to check out if you start here.
- One of the houses in the area has a cellar, so don't forget to check it. It usually has a chest and an ammo box, but sometimes it can have two chests.
- There is an ice cream truck on a tiny hill directly east of landing that almost always has one or two chests. From there you can go into the Wailing Woods or stick to the coast, where you'll find a fort and some smaller loot spots.
- The Wailing Woods has a hedge maze that stands out from the rest of the forest. If you head there and notice nobody has been there, make sure you walk along the top of the hedges and look down for hidden items and chests. If you're very lucky with your circle, the maze is also a good place to begin building your base for the end game. Just keep an eye out on the forest: you never know when you'll spy someone trying to hide amongst the trees.
- Don't neglect the bridge immediately west. Like we said earlier, in the beginning of a game, bridges are a great place to get loot. You can look for chests on the bridge and in the river below.
- If you have a western circle, you need to head west to Anarchy Acres. Follow the same strategy as for the Fatal Fields, and look around constantly because you're in an open area. Anarchy Acres is doubly special because of two secrets most players miss:
- The silos can contain a chest, so be sure to keep a look out for them as you head into the area. If they're still there, you have a good chance at getting a chest. If the silos are not there, you probably have enough information to know you should go somewhere else instead.
- Just north of the big house in Anarchy Acres, there is a ridge. If you drop off of the ridge and look at its side, there should be a cave that has been boarded off. Take a quick look because sometimes there is a chest there, and if not, there should at least be an ammo crate.

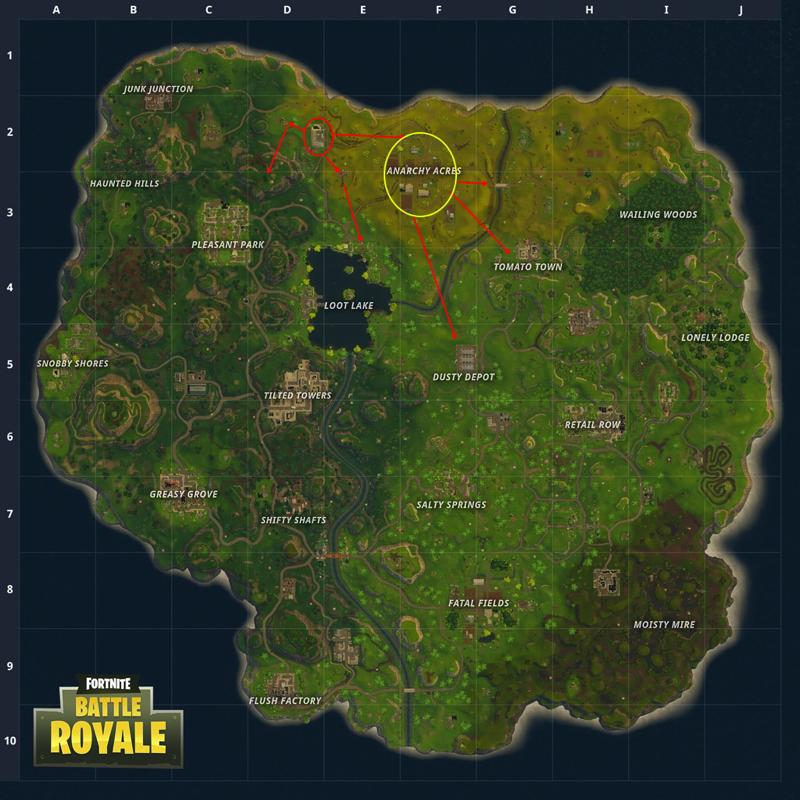
Motel
This is a more obvious spot on the map, so you might encounter more players here, but you'll have a great opportunity for loot. The motel often has several chests (don't forget to check the rafters), and there is a truck in the parking lot that often spawns a chest as well. There is also a destroyed house right next to the motel if you see players headed in the same direction.
- Very close to the motel to the southwest is a quarry. This quarry typically has two weapons outside to pick up, and if you descend to the mine area, there is sometimes a chest. There is also a secret room in the mine, so be sure to knock down the walls in the mine. Once you knock down the proper wall, there are two rocks that obscure another spawn point. Look for the bright light and sparkling sounds that the chests make to find them.
- From there, your main progression will be towards Anarchy Acres, this time from the west. Remember the silos, and keep an eye out for the cave to the north of the farm.
- If the circle is in the eastern hemisphere, you can proceed to the northeast river homes and follow the routes previously mentioned. You can also go towards Tomato Town and check the tunnel secret spot again.
- If you're desperate after landing, you can head for the houses and the hill to the west, or you can even go to Loot Lake and try to scavenge for a chest someone may have missed. If you're really desperate, you can even make the run to Dusty Depot. People often don't bother trying to get the weapons between the buildings.

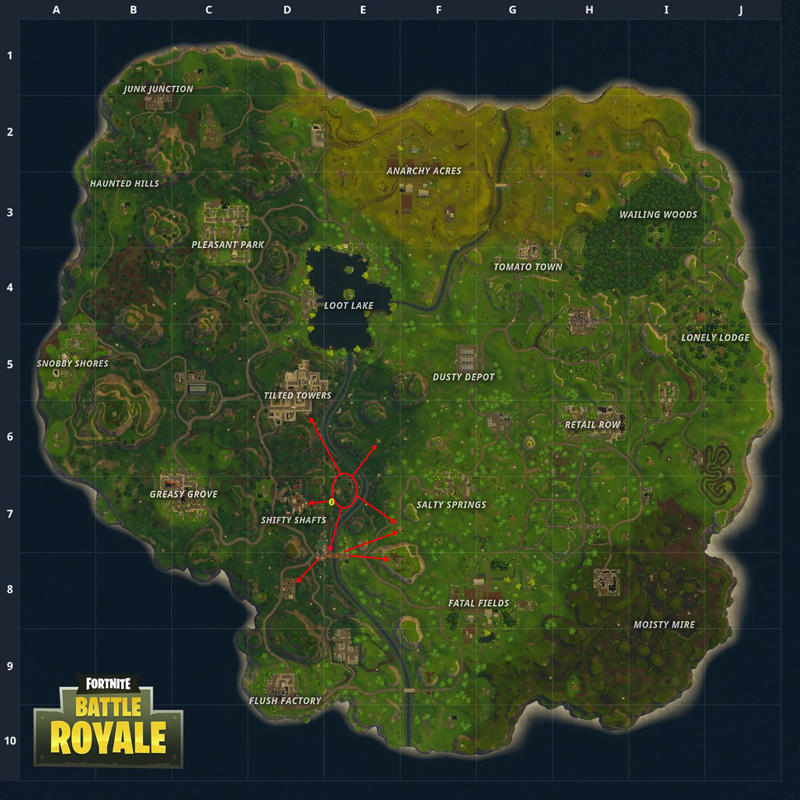
Crashed Bus
This is my favorite spot when I am feeling risky. Located on a hill at G7, it's not the best landing zone, but if you want something more central, you should definitely consider the bus crash site. You'll come across the crashed Battle Royale bus, which usually has a chest on top of it and one on the ground next to it. After you're done looting the area, don't forget to harvest the bus for metal. Remember, if you want to land here, you need to make sure you're the first to the bus. There is not enough room by the crashed bus for two enemies to share the space without attacking each other. If you land first, you should be able to kill anyone else who lands there. If you see someone land there before you, then you need to find a different spot to go to, like the bridge.
- From the hill, you can drop off the side and go to a watchtower which usually has a weapon or some ammo. You'll then have two choices from the watchtower:
- You can go north into Shifty Shafts, but be careful of other people who may have dropped there (it's a popular spot). Don't forget to check the vehicle by the mines; there are often chests hidden in the truck beds.
- You can go south to the central bridge. The bridge has two levels, so don't forget to check both. Be vigilant -- people can see you from far away if you're on the bridge. From the bridge, I recommend going east. There is a big mountain with a house on top you can use to plan your next move.
- You can also drop off the hill to the east and go towards the Salty Springs, or north towards the Tilted Towers. The thing to remember about landing on the crash bus is you're giving yourself options by being near the center of the map. The circle dictates where you go, and with this landing spot, you'll want to reach the circle quickly and set yourself up in advantageous spots in case a fight breaks out.
---
That does it for this landing spots guide. Remember, you want to give yourself options after your initial drop point. If you try out these routes, share your success stories with us! Did we miss any hidden chests on the routes we suggested? Let us know in the comments below.
As always, be sure to stick around GameSkinny for all of your guides, updates, and news for Fortnite. If you're looking for other Fortnite guides here at GameSkinny, then be sure to check them out below:


Published: Feb 5, 2018 05:32 pm