Despite a fairly substantial nerf, the Divinity Exotic Trace Rifle is still one of the best endgame weapons in Destiny 2. You won’t be doing tons of damage with it, but the weak spot it creates — and the debuff that comes with it — makes mobile Raids like Rhulk much more manageable. It also allows for a plethora of quick-kill strategies against bosses that just sit in one place. If you actually want the weapon, however, and don’t want to rely on teammates to use it, be prepared for quite the grind. Here’s how to get the Divinity Exotic Trace Rifle in Destiny 2.
How to Get the Divinity Exotic Trace Rifle in Destiny 2
- Go to Sorrow’s Harbor on the Moon.
- Go toward the Lunar Battlegrounds.
- Then go left into a cave when the location marker appears.
- Reach a Vex Gate inside the cave.
- Defeat the Vex Minotaur boss.
- Complete the Divine Fragmentation quest.
- Complete the Garden of Salvation puzzles.
Divinity Exotic Trace Rifle Step-By-Step Walkthrough

These are the exact steps to take to get the Divinity Exotic Trace Rifle in Destiny 2. Start your quest for Divinity by heading to the Sorrow’s Harbor landing zone on the Moon. You’re looking for the item required to start the Divine Fragmentation quest that rewards the weapon.
If you’re facing the Scarlet Keep, turn right (or east) and follow the path around the edge of the keep, through a cave, and continue until you reach the Lunar Battlegrounds. Once you see the Lunar Battlegrounds location marker come up on your screen, make an immediate left, past several Vex Goblins and Hydras, and into another cave.
Follow the tunnel until you reach a large Vex Gate. Nothing will happen at first, but when you approach the gate and step on the platform, Vex enemies will spawn in great numbers. Kill everything. Once the dust clears, a final wave will spawn, including a huge Vex Minotaur boss named Zeteon, Redemptive Mind.
Thankfully, all legacy content is at the current power floor, so even bosses are relatively squishy, especially given the Subclass 3.0 updates. Zeteon should go down easily enough with a Solar class and something like the Gjallarhorn. Once defeated, it will drop an Exotic engram. Picking up the engram officially starts the Divine Fragmentation quest for Divinity.
Divine Fragmentation Quest for Divinity Step 1: Analyze Vex Cores
The first step of Divine Fragmentation takes you to Nessus, where you need to enter three Lost Sectors: The Orrery in Artifact’s Edge, The Conflux in The Cistern, and the Ancient’s Haunt in The Tangle. You don’t need to complete the Lost Sector, and indeed shouldn’t. Instead, look for side paths with glowing Vex cores in them. These are usually visible from a ways out, but if you’re having trouble finding them, look around the dark corners of the Sector. When you interact with the core, a wave of enemies will spawn, and you can analyze the core when they’re dead.
Divine Fragmentation Quest for Divinity Step 2: Repair the Decryption Core
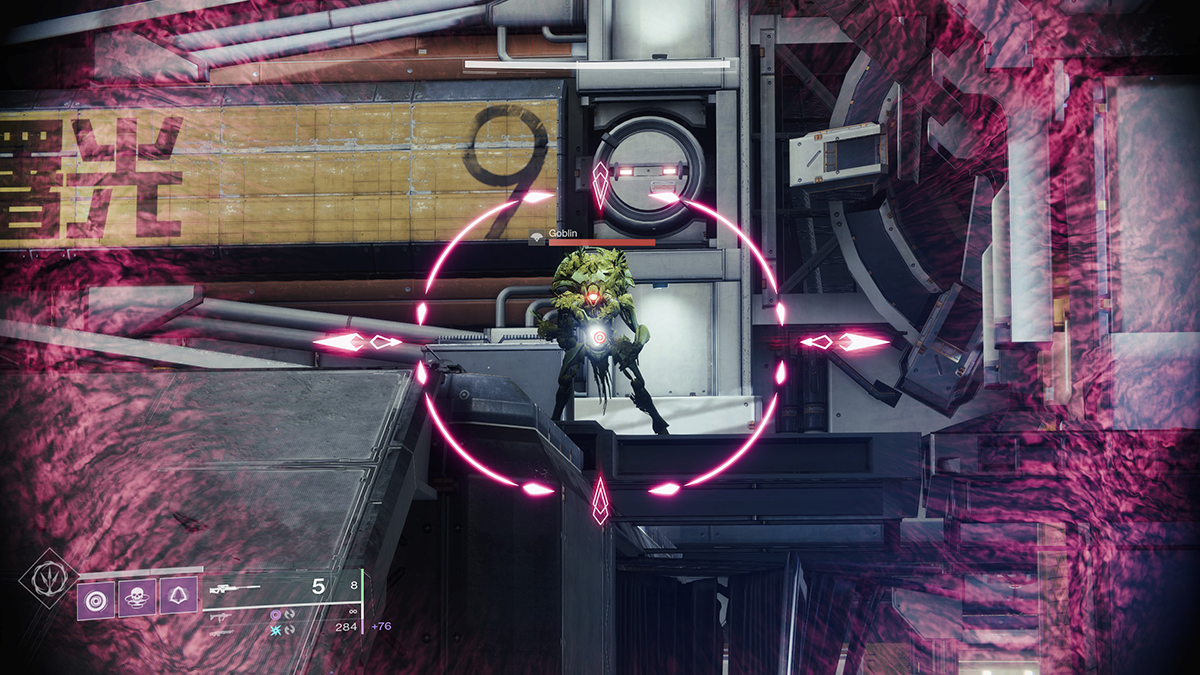
To complete Step 2 of Divine Fragmentation, you need to defeat 120 Sol Divisive Vex, the unique Vex covered in leaves and other plant life. Sadly, these are pretty rare, as they were introduced in the Shadowkeep expansion and its accompanying seasons, with few introductions since then. There are three main sources right now:
- On the Moon in the three southern sections, but only in small numbers. I tend to see them in groups of no more than four at a time, and there’s almost always at least one other Guardian in the area, making farming here a poor experience.
- As the main enemies in the Garden of Salvation Raid. You’ll be more familiar with Garden than you might ever want to be by the end of the Divinity quest, so unless you like the experience (and I don’t know why you would, really).
- As the main enemies in the Spire of the Watcher Dungeon. Spire has some of the better loot currently available in Destiny 2, whether for its fashion in the armor or function in its unique Special Grenade Launcher, so I recommend the Dungeon grind if you manage it.
Divine Fragmentation Quest for Divinity Step 3: Empower the Core
Empowering the Vex Core for Step 3 of Divine Fragmentation is the simplest part of the quest so far. Start by traveling to the Sanctuary landing zone on the Moon and use the Lectern of Enchantment to empower the decryption core. You’ll need 30 Phantasmal Fragments to do so, and if you aren’t an unfortunate and jaded Destiny 2 veteran like me, head to Sorrow’s Harbor in the north of the Moon map and defeat some Nightmares. You can break up the monotony of Altars of Sorrow and other Fragment farming with some Lost Sectors on the Moon, as there are plenty of Nightmares there as well.
Divine Fragmentation Quest for Divinity Step 4: Enter the Garden

Here comes the fun part. The fourth and final step of the Divine Fragmentation quest requires that you not only complete the Garden of Salvation Raid (and I shudder at that thought alone), but you need to complete tether-based puzzles in the areas around every encounter, save the final boss. These tethers are much like the ones you created to progress the first encounter but require all six of your teammates working together to solve properly.
Hidden in the traversal areas between the Garden sections are six Vex terminals that, once activated, spawn a tether at the starting player. A message at the bottom left of your screen will read “INITIATED: Security bypass protocol” once you start. For a visual rundown of all of these puzzles, check out YouTuber Datto’s video at timestamp 3:30, but I’ll provide a simplified rundown here, as well.
How to Solve the First and Second Tether Puzzle in the Garden of Salvation
The first tether puzzle in the Garden of Salvation is available immediately after you spawn into the Raid. Jump off the platform into the abyss behind the spawn point and travel through the opening below the starting platform. From there, canvas the area below the opening encounter for a Vex tether starter conflux, four connecting points, and a final terminal conflux.
Almost all of these will connect via holes in the wall, so each member of your fireteam needs to progress deeper beneath the first encounter area until they reach the next connection. The player at the starting conflux will activate the tether. Then the team will need to coordinate keeping all six Guardians connected carefully.
The tricky bit here is the distance between each connecting point, and this for me, is probably the most frustrating portion of this quest step. You’ll be stretching each tether to its limit, and if you’re worried about it turning a thin orange, don’t be. That’s just how you solve this first bit. When you’re finally successful, and each time you complete a portion of this step, you’ll receive the “ACCEPTED: Singular security bypass” message.
The second part of the puzzle is on the platform with all the Cyclopses, accessible after the Harpy boss teleports away. There’s a nook near the end of the platform — but before you drop down — that you can crouch through. The process here is much the same. One player starts the process, and all the other members of the fireteam spread out to connect the tethers. The latter portions of this part require you to do some platforming around a central Vex shield.
How to Solve the Third Tether Puzzle in the Garden of Salvation
The third encounter puzzle is in the large platforming section in the blue room where you’re jumping across huge leaves. The tether activation point is beneath the long branch near the area’s end, and your team’s goal is to connect said tether through the six orange polyhedrons that appear. The problem? It’s not a straight shot. Your fireteam needs to connect the tethers in what might seem a haphazard way such that they can account for the split along the branch. It takes some (for me) brain-frying geometric thinking to get right.
How to Solve the Fourth Tether Puzzle in the Garden of Salvation
The fourth tether puzzle starts after you defeat the Consecrated Mind Harpy boss. The starting tether conflux is near the edge of one of the pathways leading from the central platform. Your whole fireteam will need to be connected together in an unbroken chain. From there, you activate the six polyhedrons again.
If you thought that was it, though, do I have news for you. Once all the polyhedrons are active, you need to go back to the starting conflux, activate it, connect everyone again, then carry the completed chain to the encounter area’s exit, where some Supplicants will spawn. And no, you can’t break the chain to kill them. Whether you go the long way or jump through the rotating cylinder is up to you, but you’ll then need to solve another polyhedron puzzle.
From there, proceed past the section with the huge rotating blades and go between the two radiolarian waterfalls, through a cave there. You’ll activate a thankfully simple tether puzzle. The starting conflux is to the end, further to the left, and the end point is near the cave entrance. Doing so activates the final and final puzzle.
How to Solve the Fifth Puzzle in the Garden of Salvation
Six bright diamonds will be arranged in a rectangular pattern on the floor. Activating the tether cube will start the final puzzle. White lines will connect the diamonds, and your team must replicate those patterns shortly after they appear. Assign each squadmate a number and a number to each plate. The person with number one will always need to be on the starting diamond, and six will always go on the end. You’ll be recreating these patterns seven times.
If you’re successful at this final trial, you’ll receive the “COMPLETED: All security bypassed” message. Now, beat the final boss of Garden of Salvation. If you’ve done everything right and have the Divine Fragmentation quest in your inventory, you’ll receive the Divinity Exotic Trace Rifle from a second reward chest at the Veiled Figure.
That’s how to get the Divinity Exotic Trace Rifle in Destiny 2. Expect the whole process to take several hours, especially if your team has trouble with the puzzles in the Raid. But know this: Divinity is well worth the effort, even if only one member of your team has it. For more Destiny 2 content, check out our guides hub.





Published: Jul 28, 2023 12:14 pm