Now that the full version of Warhammer: Vermintide 2 has launched after the extensive beta testing period, there are significantly more maps to explore with your adventuring companions.
One of those new maps is the deceptive Halescourge, which seems like an absolute cakewalk of typical Skaven hordes … until you hit the fat spellcasting boss. Resist the urge to slam your keyboard into the wall or throw your controller at the TV, and follow our guide below to finish this Vermintide 2 map!
Halescourge Tome/Grimoire Locations
As with most of the levels, there are two possible grimoires and three tomes to pick up if you are willing to trade off health and healing potion slots for better loot and experience gains.
Halescourge Grimoire #1
This one is found after the second tome (see below), typically during the “Search For Burblespue Halescourge” objective. When you drop down a stone ledge onto a wood bridge with a bunch of crows, you will see a building start to fall over.
Run down the path beneath the falling building, and hop down to the lower level. Turn around and go back the way you came to see a broken wall where you can jump across into a building. The grimoire is in the bookshelf in that room.
 Halescourge Grimoire 1 Location (thanks to YouTuber General McBadass for the screenshots)
Halescourge Grimoire #2
Following the third tome (see below) when you head through a tunnel with a bunch of bodies hanging from the ceiling, go forward through the street where there’s a cart and a bunch more bodies on the ground. There will be tall buildings on your right and left (the building on the right should have a flag hanging off it).
Point your ranged weapon up at the ladder visible on the side of the building on your left, and fire to knock the ladder down. Climb up the ladder and you will see the grimoire sitting on the wood platform in front of a door.
 Shooting down the ladder to reach Halescourge Grimoire 2
Halescourge Tome #1
When coming down a set of stone stairs during the “Find Your Way Down The Terraces” objective, jump down off the left side to a lower area and look for a small hole in the wall at your feet. Crouch down and head inside to find this tome in the back of the hidden room inside a crate.
Halescourge Tome #2
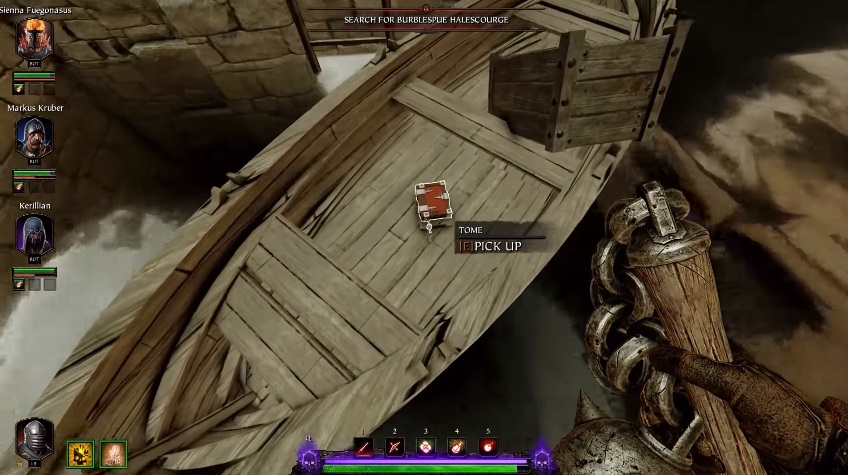
When you jump across a wood platform to a new area with a big green banner on the wall, stay up on the rooftop section and turn left at the tunnel (instead of jumping down). Immediately hang a right and go down the stairs to see this tome sitting on a boat.
Halescourge Tome #3
After the first grimoire (see above), look for the only visible standing tower next to a destroyed wall. Head inside and climb up the ladder to find the third tome sitting on a shelf.
Halescourge Boss Guide
This bloated sorcerer is easily one of the hardest bosses from a tactical standpoint, and you can expect to try this run several times before getting the kill. Halescourge is difficult even on the easiest setting, and if you have a heroic deed to battle him with increased health or damage, all I can say is “good luck.”
Melee is very risky, so protect your ranged combatants from the hordes of summoned enemies while they hit the boss from afar. Move out of the way and reposition when the boss teleports near you or starts firing off those projectiles, as they are difficult to dodge when you are close. Standing behind the wooden beams at the proper angle can let you avoid the acid attacks.
While dodging all the special enemies that spawn, keep a careful watch for the spell casting animations with his book and staff. If you see it begin, dodge repeatedly in the same direction to avoid the attack, then you can run in for a few melee swings and get out if you time it properly. Getting behind him to attack before he teleports away is a good tactic, although it’s sort of luck of the draw as to whether you will get there in time.
When you run out of ammo (and you probably will because this battle is brutal), it’s actually possible to hit the boss from underneath when he teleports up onto the platforms.
As with all bosses, strength potions and bombs are helpful in increasing the damage, but be wary of the teleporting! He may just blink away from the bomb before it goes off.
That’s all you need to know to have a solid chance at beating the Halescourge level and taking out this insane boss. Need help staying alive or finding tomes to get better loot in the rest of Vermintide 2? Check out our other guides here:
- How To Skip The Tutorial
- Vermintide 2 Beginner’s Tips And Strategies
- Extracting And Applying Weapon Illusions
- Vermintide 2 Grimoire And Tome Locations
- Vermintide 2 Weapon Traits And Properties


Published: Mar 12, 2018 01:23 pm