The Hexfoundry Unhinged jumping puzzle in Guild Wars 2 is located in Sparkfly Fen just southeast of the Darkweather Waypoint. You’ll want to head towards the point of interest, Hexfoundry G-14, then go past it. Bypass the Inquest in the lab and jump over the glowing gate in the back via the boxes near it. You’re now officially in the Hexfoundry jumping puzzle.
Note the terminal to the left; you’ll see a lot of this around the puzzle.
The goal is to get past the three glowing barriers that seal off a room located on the left side of the puzzle — this is where the puzzle’s chest is and where you get credit for the achievement. To do this, you have to activate three switches that are hidden throughout the jumping puzzle.
- Note: The switches will stay off for quite some time, so you may want to check and see if the chest room is already open. If it is, you can skip straight to the chest.
As with most jumping puzzles nowadays, gliding makes this easier.
Caution: There are Veteran level mobs throughout the puzzle, mainly risen creatures, most you can bypass and ignore. There is a Champion Risen Sea Turtle in the water deep in the water.
Where to Find the Switches for Hexfoundry JP in GW2
First Switch
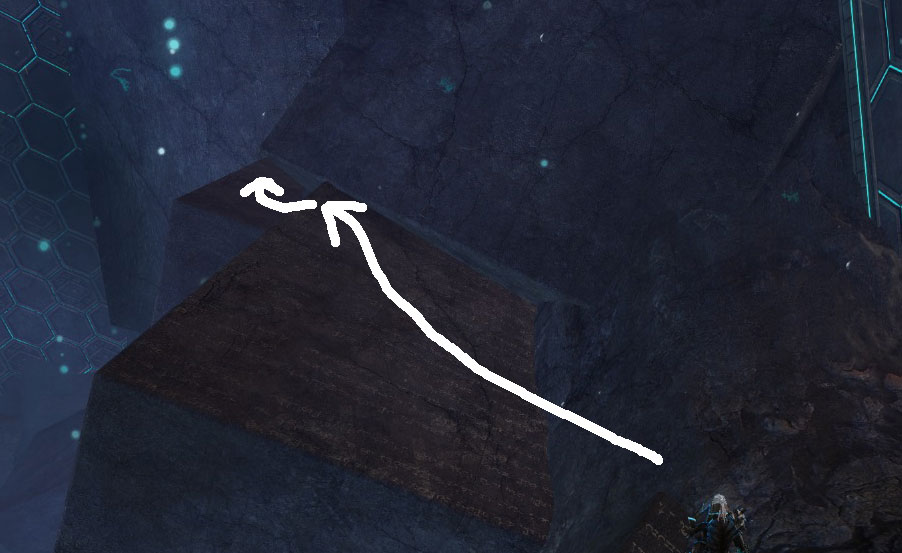
From the entrance, fall into the water. Swim to the other end of the pool and look for a section of shore that is lit up with a hexagon-pattern. Exit here and follow the path up. You’ll pass a Veteran Risen Quaggan and another terminal. Then you can jump up onto the large slab that above your head near the end of the path — you’re pretty much making a U-turn, but on a higher level.
Move south along this slab, and you should see the first switch. You want to get on top of it by jumping on the bit of broken wall before it, then right on top. It should be possible to disable it from here. If not, you can drop down and switch it off that way. Then you can get back up by turning around and going up the slope again.
Second Switch
From the top of the first switch, jump off the south side — the right if you’re facing the chest room. Continue south, and you’ll come to a point where you’ll have to jump around the corner of a cube-like slab sticking out of the wall. This is a whole lot easier than it looks.
Once you do, run up the slope and turn around, so you’re facing three glitched platforms. The switch is on the other side of these. Take your time, and you should be able to cross these quickly.
- Note: If you have gliding unlocked, you can bypass the glitched platforms and glide across.
Third Switch
This switch is far more hidden than the first two. Face the chest room from the slab that the second switch is on, then jump down and follow the path past both the chest room and terminal. Once you reach the end, jump on the glowing, floating platforms. Jump from platform to platform towards the two glitching switches.
You’re going to head between these two, and down towards a third glitched switch. Be careful — there is a drop just before the third. If you fall there, you will find a basic chest, but you’ll have to start over to get back to the third.
Once you’re at the third glitched switch, face the terminal that is in the same area. There’s a small ramp left of the terminal — take that and you’ll see a series of ramps up. You’ll run into a Veteran Flesh Golem — ignore it or kill it. Turn around, and you’ll see the last switch.
Where to Find Chests for the Hexfoundry JP in GW2
Basic Chest
Since you’re already here, you might as well get the basic chest — more loot, yay! Jump down from the third switch back to where the glitched switch and terminal was. Now jump down the crevice you jumped over before. You’ll land on top of the basic chest.
To get out from here, head towards the glowing pillar then look for the corridor of lasers. These do a decent amount of damage, so having skills equipped that can cleanse fire are helpful.
Grand Chest
Once you’re past the laser death trap, just swim back to the slabs that will take you back to the Chest room. A Veteran Golem should spawn — one did not spawn when I did this on two of my characters earlier, but I don’t know for certain whether they took this out or not, so be careful.
—
That wraps up our guide to completing the Hexfoundry Unhinged jumping puzzle! Congrats on you loot and achievement! For more help with the game, check out the rest of our Guild Wars 2 guides. Happy jumping!
- Guild Wars 2: How to Solve the Crash Site Jumping Puzzle and Get the Diving Goggles
- Guild Wars 2: How to Get the Flames of War Legendary Weapon
- Guild Wars 2 Flashpoint Guide: How to Get the Legendary Armor


Published: Jul 26, 2017 11:24 am